How do you ensure that you take pictures useful in your research? Are there ways by which you can maximize the use of your digital camera? Indeed there are important points to consider when taking pictures specifically for research purposes. Read the four tips below and avoid the regrets of post-field work.
Taking pictures once proved to be too costly both to hobbyists as well as beginning photographers who have difficulty ensuring that the pictures they take are worth the money they spend for film processing and photograph development in a commercial photo shop. That is during the age of the film-based cameras decades back. But with the popularity and greater resolution accorded by digital camera nowadays, this is not much of a concern as you can preview your shots either in your digital camera or your computer.
If you are a researcher or a college student working on a thesis, a certain degree of knowledge and skill in taking pictures must be had to get the most out of pictures taken in the field. At the very least, you should be able to apply the following tips in your pictures to make your output more technically oriented and effective in your presentation of results:
1. Think first of your intention in taking the photograph.
Before taking pictures, you should bear in mind the objective of your research. This will determine the focus as well as the background you need to include as you compose your picture. What do you want to portray? Do you need to make a close up shot or a shot that includes the landscape? At what angle should you take the picture?
This can be made clearer by citing an example. Say, you want to discriminate a male from a female crab, or specifically the abdominal structure difference between the two. This, of course, will mean that you will have to turn the crab upside down (or dorsal side down) to reveal the abdominal structures and lay down two samples together to show differences before taking the shot.
2. Understand what f-stop means.
One of the important information you should have in taking pictures is understanding what an f-stop means. F-stop refers to the size of the aperture of lens that the camera will set automatically if you are using an automatic camera or can be adjusted manually if you use a camera with manual aperture adjustments. The greater the size of the lens aperture, the greater will be the amount of light that will enter the camera. This will mean fast shutter speed to make the proper exposure so that your picture will look fine.
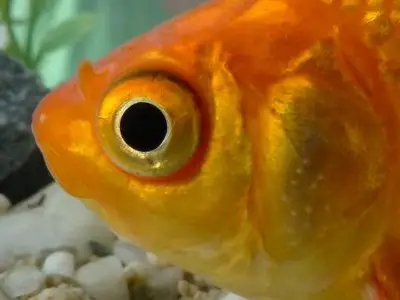
Almost always, researchers want as much clarity and detail in their pictures. So the rule is, set the lens aperture to its smallest possible size as the camera will allow; of course, with proper exposure in mind. I find that I can achieve good results using a minimum f-stop of 8.0. Using an f-stop lower than this value will cause other parts of the photograph some blur. This is alright if your intention is to highlight a certain feature like the way I highlight the eyes of a goldfish below using Panasonic Lumix LX5, a camera with manual aperture setting.

You may be intrigued how I took this shot of a swimming fish. That’s easily done in an aquarium. When taking close up shots like this, try to experiment using the highest possible f-value (smaller aperture; e.g. f8 to f22) for greater detail, that is, if your camera will enable you to do so. Great macro shots are taken in well-lighted environments.
For more useful tips on aperture setting, you may read my article in Knoji entitled “How to Take Close Up Pictures of Wild Life.”
3. Always take a picture relative to another object which you can use for size estimation.
This is an important aspect of taking photos for research purposes. This technique is especially useful if you are interested in morphometrics or quantitative analysis of form used in comparing or discriminating different species of animals.
If you have forgotten your ruler or measuring scale, a ballpen which you can measure later is useful in the field. Place it next to the object (preferably below it) on level ground so that it lies parallel to your specimen. That eliminates guesswork of size. I show an example below.
Having the lower number in the scale at left facilitates reading the length from left to right which is a normal reading mode in most countries. The total length of this shrimp is 5.7 cm from tail tip to tip of the snout (excluding the whiskers of course).
However, I do not recommend the blue ruler that my student brought in the field during our exploratory trip of a mangrove area. It is better to use a transparent one so that the ruler gridlines will contrast better.
4. Take as many pictures as your SD card will allow.
Take as much picture as possible in the field on just a single point of interest so you will have choices of the best shot. To avoid missing out the important pictures and to allow you to take video shots at the same time, a 16GB memory card will be sufficient. Just make sure you have extra, charged and protected battery for your camera.
A camera with a global positioning system (GPS) will be helpful as it will allow you to recall where you took your shots as well as enable you to plot your specimen’s source on a digital map. Google Earth is useful for this purpose. Click on the pin function and type the latitude and longitude coordinates to pinpoint the source of your pictures.
Bear this photography tips in mind to make the most of field trips required to fulfill the objectives of your research.
© 2013 May 14 P. A. Regoniel


